How to Make Sure Mailchimp Emails Don’t Go to Spam
Mailchimp — now part of the Intuit ecosystem (QuickBooks, TurboTax, Credit Karma) — is one of the most widely used email marketing platforms globally, powering newsletters, promotions, and automated customer journeys for businesses of every size. Its approachable interface and powerful automation make it a top choice for hospitality, eCommerce, and enterprise teams alike. However, sending emails is not the same as being seen. Even beautifully designed campaigns can land in Spam or Promotions folders. This guide shows you how to maximize deliverability so your Mailchimp emails reach the Primary Inbox.
Why Emails Go to Spam
Most inbox placement issues fall into three buckets:
- Authentication not configured: Missing or misconfigured SPF, DKIM, or DMARC.
- Weak sender reputation: High bounces, spam complaints, or prolonged low engagement.
- Content triggers: Overly promotional language, image-only emails, or poor text-to-image balance.
Step 1: Authenticate Your Domain (Most Important)
Authenticate your sending domain so Gmail, Outlook, and Yahoo know Mailchimp is authorized to send on your behalf. This is the single biggest lever for avoiding spam.
What to set up
- SPF: Authorizes Mailchimp as a permitted sender for your domain.
- DKIM: Cryptographically signs messages to confirm authenticity.
- DMARC: Instructs mailbox providers how to handle unauthenticated mail and provides reporting.
Step 2: Send from a Professional Domain
Use a branded address like yourname@yourdomain.com. Avoid free webmail senders (Gmail, Yahoo, Outlook) for bulk campaigns — they’re more likely to be filtered or flagged.
Step 3: Clean and Warm Your Email List
Best practices
- Prune inactives: Suppress contacts who have not opened in 90+ days.
- Avoid generic inboxes: Minimize sends to
info@,admin@,sales@when possible. - Warm gradually: Start with your most engaged segment; expand as engagement holds (open/click).
Step 4: Optimize Email Content for Inbox Placement
Reduce spam triggers
- Avoid shouty copy (e.g., FREE!!!, all caps, excessive punctuation).
- Keep roughly 60% text / 40% images and include alt text.
- Provide a clean plain-text version (Mailchimp auto-generates — review it).
- Use descriptive, honest subject lines and preview text that match email content.
Step 5: Include Real Brand Info & Unsubscribe Link
Legitimate emails always include a physical mailing address and a visible unsubscribe link. This helps with compliance and improves trust signals to mailbox providers.
Step 6: Encourage Users to Mark Your Email as Safe
Add a short footer line to train inboxes via engagement:
If this email appears in Promotions or Spam, please drag it to your Primary inbox and add us to your contacts to ensure you receive VIP updates.
Step 7: Track Deliverability Metrics
- Open Rate: Aim > 25% for engaged lists.
- Bounce Rate: Keep < 2%.
- Spam Complaints: Keep < 0.1%.
- Engagement: Clicks, replies, forwards (positive signals for future inboxing).
Tools: Mailchimp Reports, Google Postmaster Tools (for Gmail domain reputation), and deliverability testing tools (e.g., GlockApps, Mail-Tester).
How to Use UTM Parameters with GA4
Add UTM parameters to links so Google Analytics 4 can attribute traffic and conversions to specific campaigns and creatives.
?utm_source=google&utm_medium=cpc&utm_campaign=rdg_launch&utm_content=ad_variant1- utm_source: the platform (e.g., google, instagram, newsletter)
- utm_medium: the channel type (e.g., cpc, email, social)
- utm_campaign: campaign name (e.g., rdg_launch)
- utm_content: creative variant (e.g., ad_variant1)
Recommended Next Steps
- Authenticate your domain (SPF, DKIM, DMARC) and verify in Mailchimp.
- Switch to a branded sender address and warm your list in phases.
- Refine content (subject, preview text, text-to-image balance, alt text).
- Encourage “move to inbox” and contact save in your footer.
- Monitor deliverability KPIs weekly; prune inactives monthly.
Quick FAQ
Does sending fewer images help?
Yes. Pure image emails can look promotional or suspicious to filters. Aim for a balanced text-to-image ratio and include alt text.
How long does reputation building take?
For a new domain or IP, expect 2–6 weeks of gradual warm-up to establish a stable sender reputation — faster if engagement is strong.
Is DMARC required?
It’s strongly recommended. DMARC prevents spoofing and gives you visibility via aggregate reports, which improves trust and deliverability.
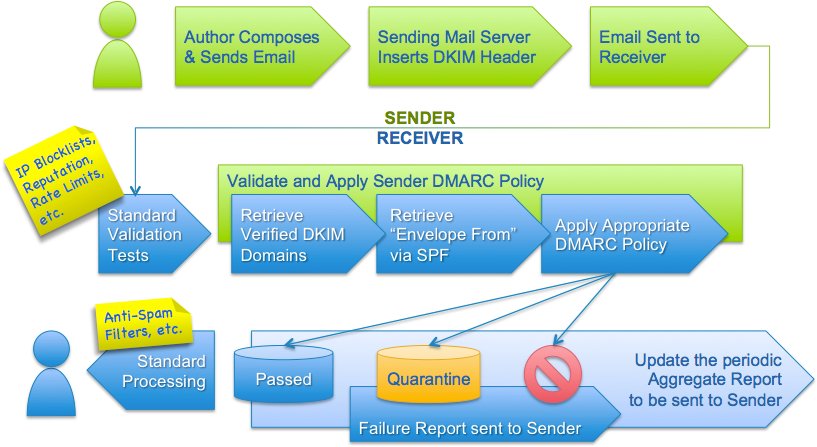
What is DMARC?
DMARC (Domain-based Message Authentication, Reporting & Conformance) is a security and email deliverability protocol that tells email providers how to handle messages sent from your domain. It helps prevent spam and phishing using your email name, and it improves inbox placement for legitimate campaigns like Mailchimp.
In simple terms: DMARC protects your brand and increases trust, making your emails more likely to land in the Primary Inbox instead of Spam or Promotions.
Learn more (official documentation): https://dmarc.org/